Git for Beginners: Basics and Essential Commands
I like making things with code. This is where I share my projects and the bugs I ran into.
The "Who Changed What?" Problem: Git's Answer
Suppose you and your three friends are working on the same project from different cities. To track changes and avoid confusion over who made a specific change, you use Git.
Git is a Version Control System that tracks every change made within a repository. It allows multiple people to work on the same project simultaneously without interfering with each other's work. The secret sauce here is branching. Each person can create a separate branch to work on a specific feature. Once the feature is complete and tested, they can merge that branch back into the main branch to sync their work with the rest of the team. To make this collaboration possible, we first need to set up the foundation. And just like any secure job site, the process starts with your identity.
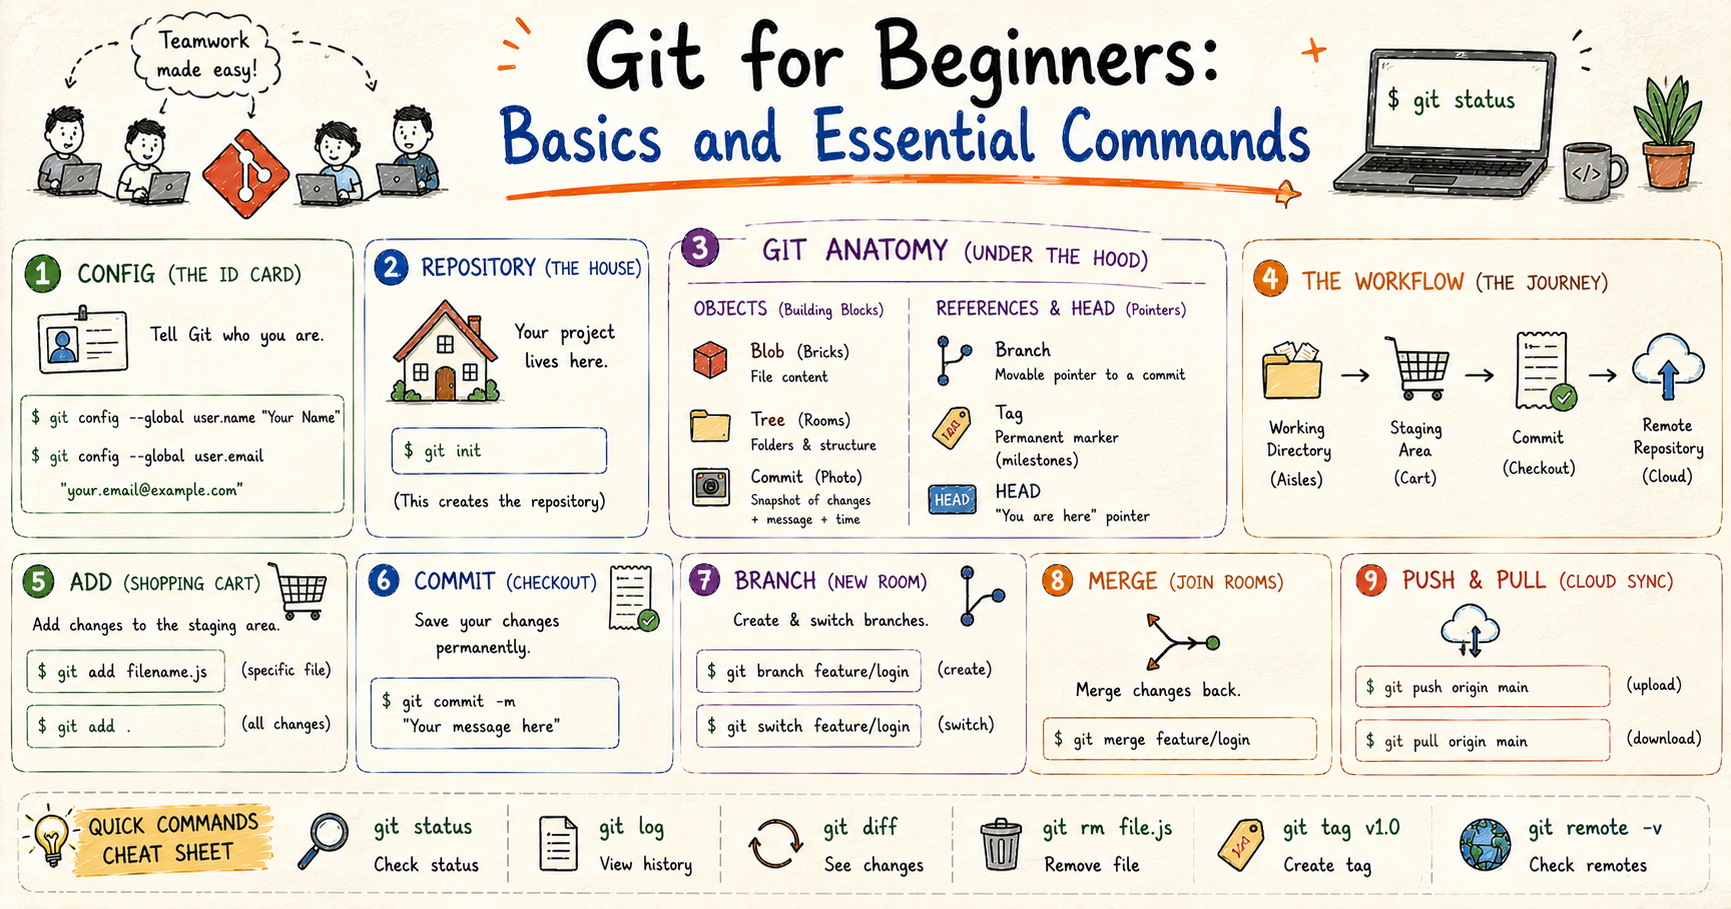
Config (The ID Card)
- Narrative: Now, before you lay a brick, the security guard needs to know who you are. Config is your ID card. Without it, Git won't know whose name to put on the work you do. Every brick you lay, every change you make, Git needs to know who to credit (or blame!) if the house collapses!
# Set your username
$ git config --global user.name "Your Name"

# Set your email
$ git config --global user.email "your.email@example.com"
Repository (The House)
- Narrative: Now that you have your ID, imagine you and your 3 friends are building a house. You need a plot of land where all the materials, blueprints, and workers live. In Git, that plot of land is the Repository. It’s the database that holds everything.
To get started, you first need to initialize Git in your project folder. You can do this by running the following command in your terminal:
git init
(This creates the repository)
Once this command is executed, Git begins tracking the directory, and you are ready to start collaborating.
But wait, there's a catch! You've got the repository on your system, but your 3 friends in other cities? They have no idea what you're doing! That's where platforms like GitHub come into picture, it's basically a cloud storage for your Git repositories that everyone can access.
Now, I know you're eager to get this online, but let's pump the brakes for a second. Before we upload anything to GitHub, we need to understand how Git actually saves your work. Trust me, it'll make way more sense once we cover that next!
Under the Hood: The Git Anatomy
Now that you have a repository set up, let's look under the hood before we start making changes.
Here's the cool part: It doesn't just save files; it takes snapshots using a very specific structure.
Objects (The Building Blocks) Just like a house is made of different materials, Git is built from Objects.
Blobs: Think of these as the bricks. A "Blob" (Binary Large Object) holds the actual contents of your files.
Trees: Think of these as the rooms. A "Tree" allows you to group Blobs together; it represents your folders and directory structure.
Commits: Think of this as the Polaroid photo of the house. A Commit wraps up the Trees and Blobs into a single snapshot, adds a timestamp.
References & HEAD (The Pointers) Objects are just building materials. But how do we find anything? That's where References (Refs) come in. Ahm! Think of them as sticky notes that tell us where things are.
Branches: We mentioned these earlier. A branch is simply a movable pointer to a specific Commit (snapshot). It lets you work on a new feature without breaking the main house.
Tags: These are permanent markers. While branches move as you work, a Tag stays put. You use these to mark important milestones, like "Version 1.0 Release."
HEAD: This is the most important concept. HEAD is the "You Are Here" marker on the map. It points to the specific branch or commit you are currently looking at. Wherever HEAD points, that is what your files look like right now.
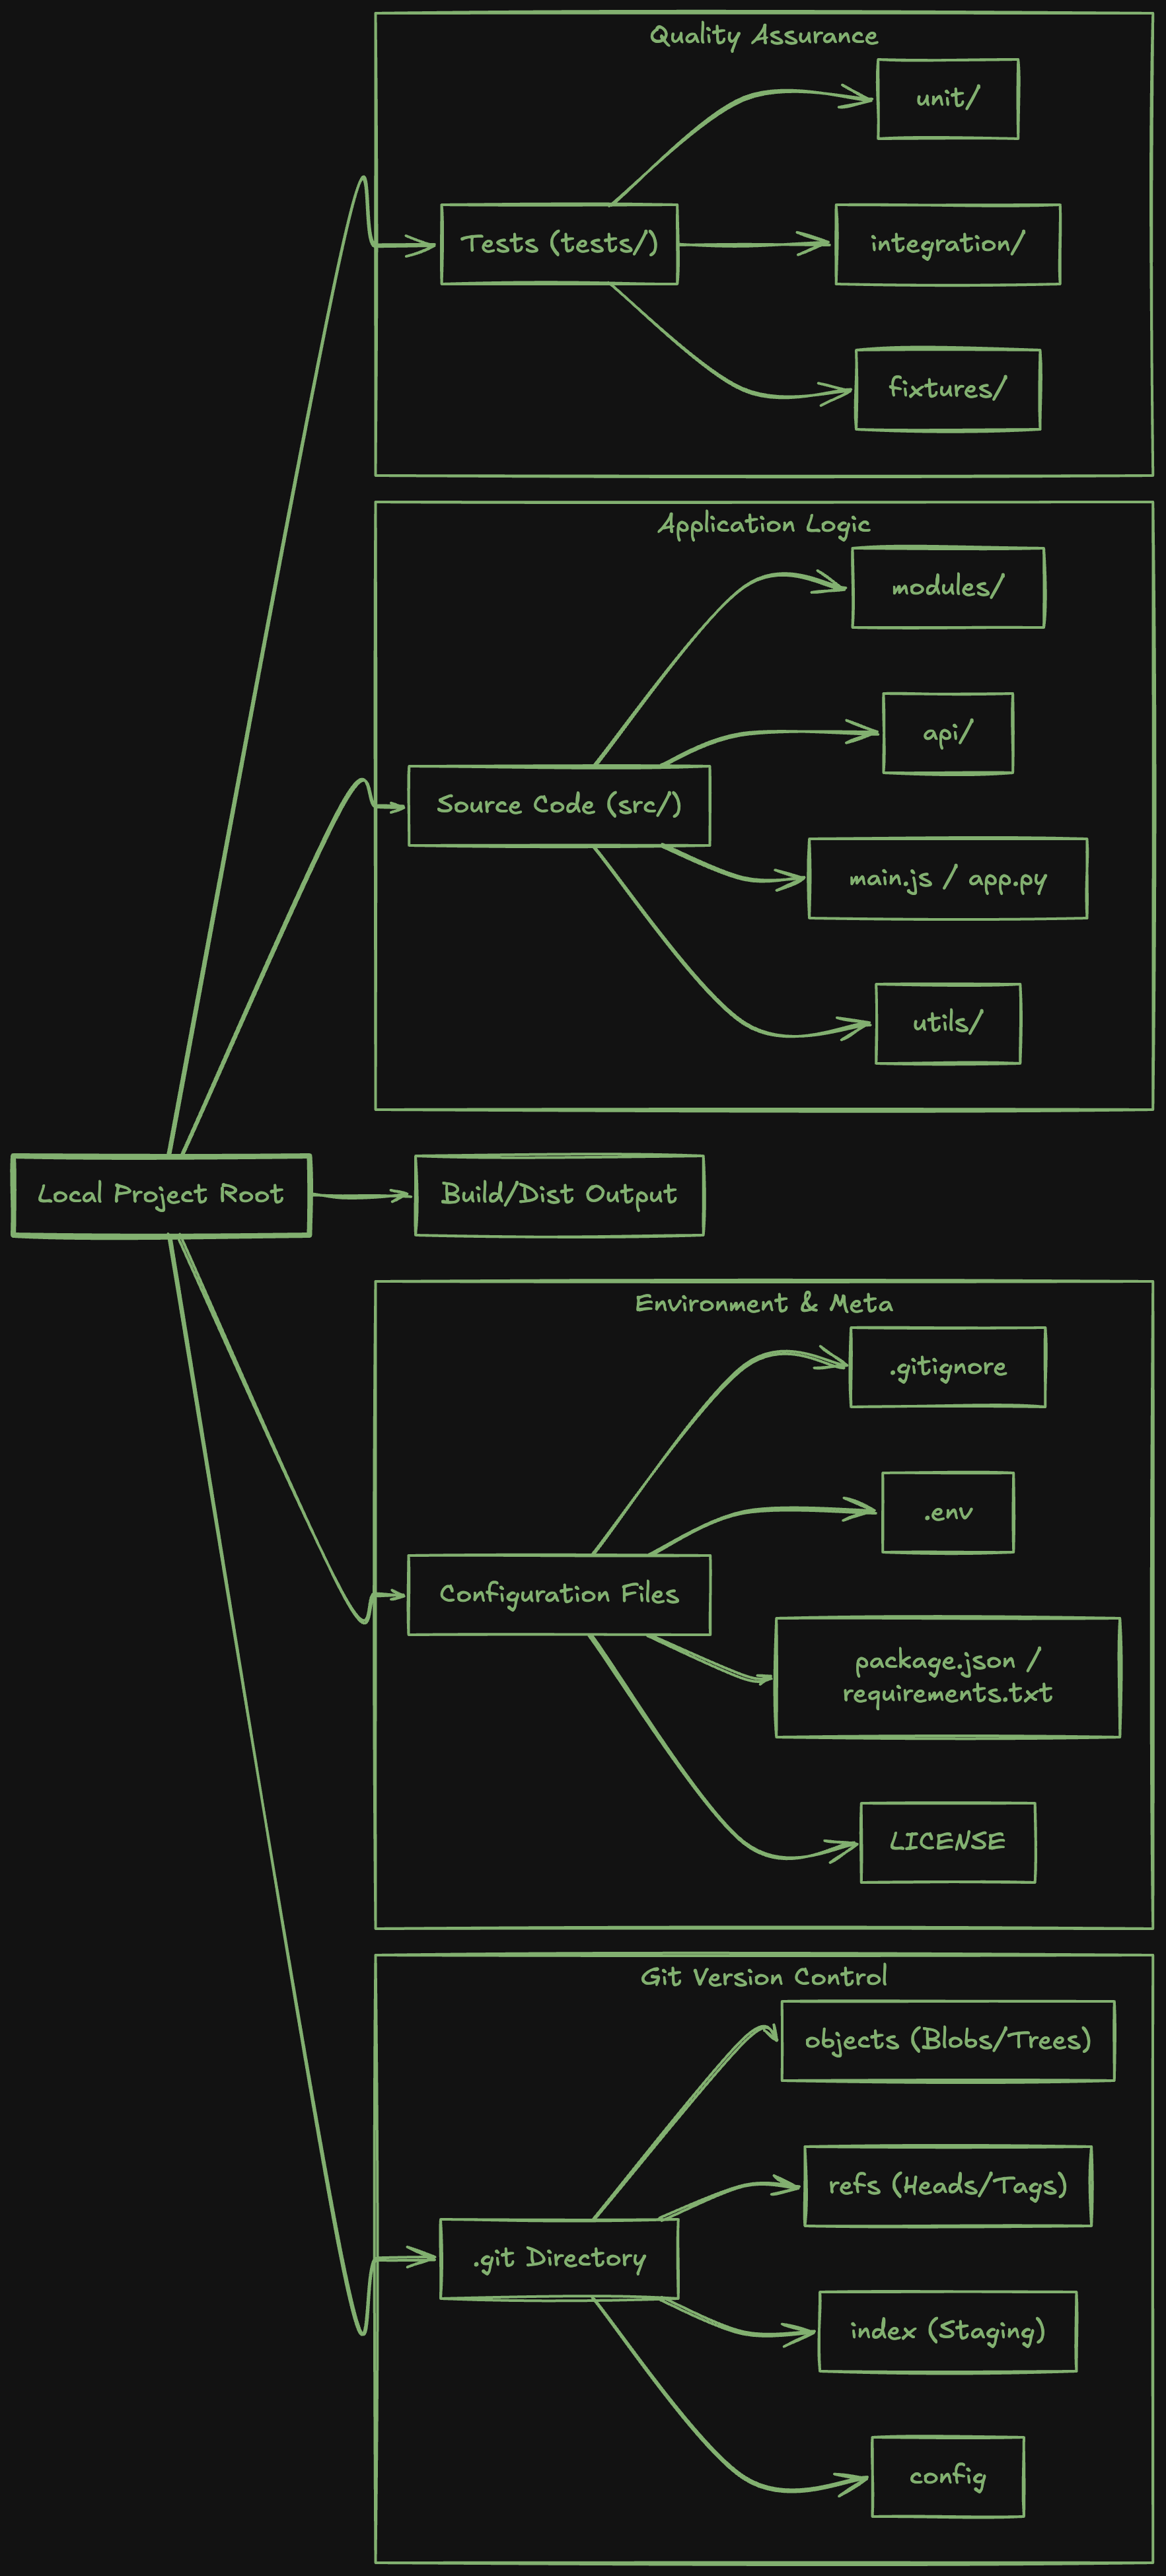
Local Repository Structure Overview
The Shopping Cart Concept: Staging Changes with git add
Now that you and your friends have the project files, you’ll start making changes. But in Git, "saving" isn't just hitting Ctrl + S. It’s actually a two step process, and the first step is git add.
I like to think of this like a shopping trip with your team:
1. The Working Directory (The Aisles) Right now, you’re just browsing the aisles. You're editing files, breaking things, and fixing them. This is your "Working Directory." Nothing here is final yet.
2. The Staging Area (The Shopping Cart) When you finish a specific file and think, "Okay, this code is good," you use git add to put it in your cart. This is called the "Staging Area." The cool thing is, just because it's in the cart doesn't mean you've bought it yet. You can still add more files or take them out if you change your mind.
# To put a specific file in your cart
$ git add filename.js

# Or, to put everything you've changed into the cart at once
$ git add .
3. The Commit (The Checkout) This is the final step where you actually "buy" the items in your cart. Once you commit, those changes become a permanent part of the project history.
Why the extra step? When I first started learning Git, this extra step seemed really annoying. But after a while, I realized why it exists. Let’s say I accidentally created a buggy file. If this extra step didn't exist, that buggy file would be added directly to my repo and could break my whole project.
Finalizing the Purchase: Saving with git commit
You’ve added your files to the staging area. Now, it’s time to finalize the deal. This is where the git commit command comes in.
Continuing our shopping trip analogy: Committing is like going to the checkout counter and paying. Once you pay, those items are officially yours. In Git, once you commit, those changes are officially saved in the project’s history.
# How to use it: To commit your changes, you need to run this command:
$ git commit -m "Your message here"

# For example:
$ git commit -m "Fixed the navigation bar bug"
The "Message" is crucial You’ll notice the -m flag followed by a message in quotes. This isn't just a random note; it’s a communication tool. Since you and your friends are working from different cities, they can't see your screen. Your commit message tells them exactly what you did.
# Bad Message: (This tells your friends nothing)
$ git commit -m "changes"

# Good Message: (This is helpful!)
$ git commit -m "Fixed the navigation bar bug"
Don’t Be Like Me
I want to share a quick story. Once, I was working on a project with my friends, but I had to rush to take my little sister to school. I was in such a hurry that I just typed: git commit -m "update"
Honestly, this wasn't a one-time thing. Whenever I was in a rush, I used to do this.
But three weeks later, I needed to check a specific change I had made. When I looked at the history, I was completely lost because every message just said "update." I had no idea what I had done or when. It created a huge confusion for me and my team. Tbh, it was a mess. So please, take the extra few seconds to write a real message, and that's why I'm saying don't be like me!
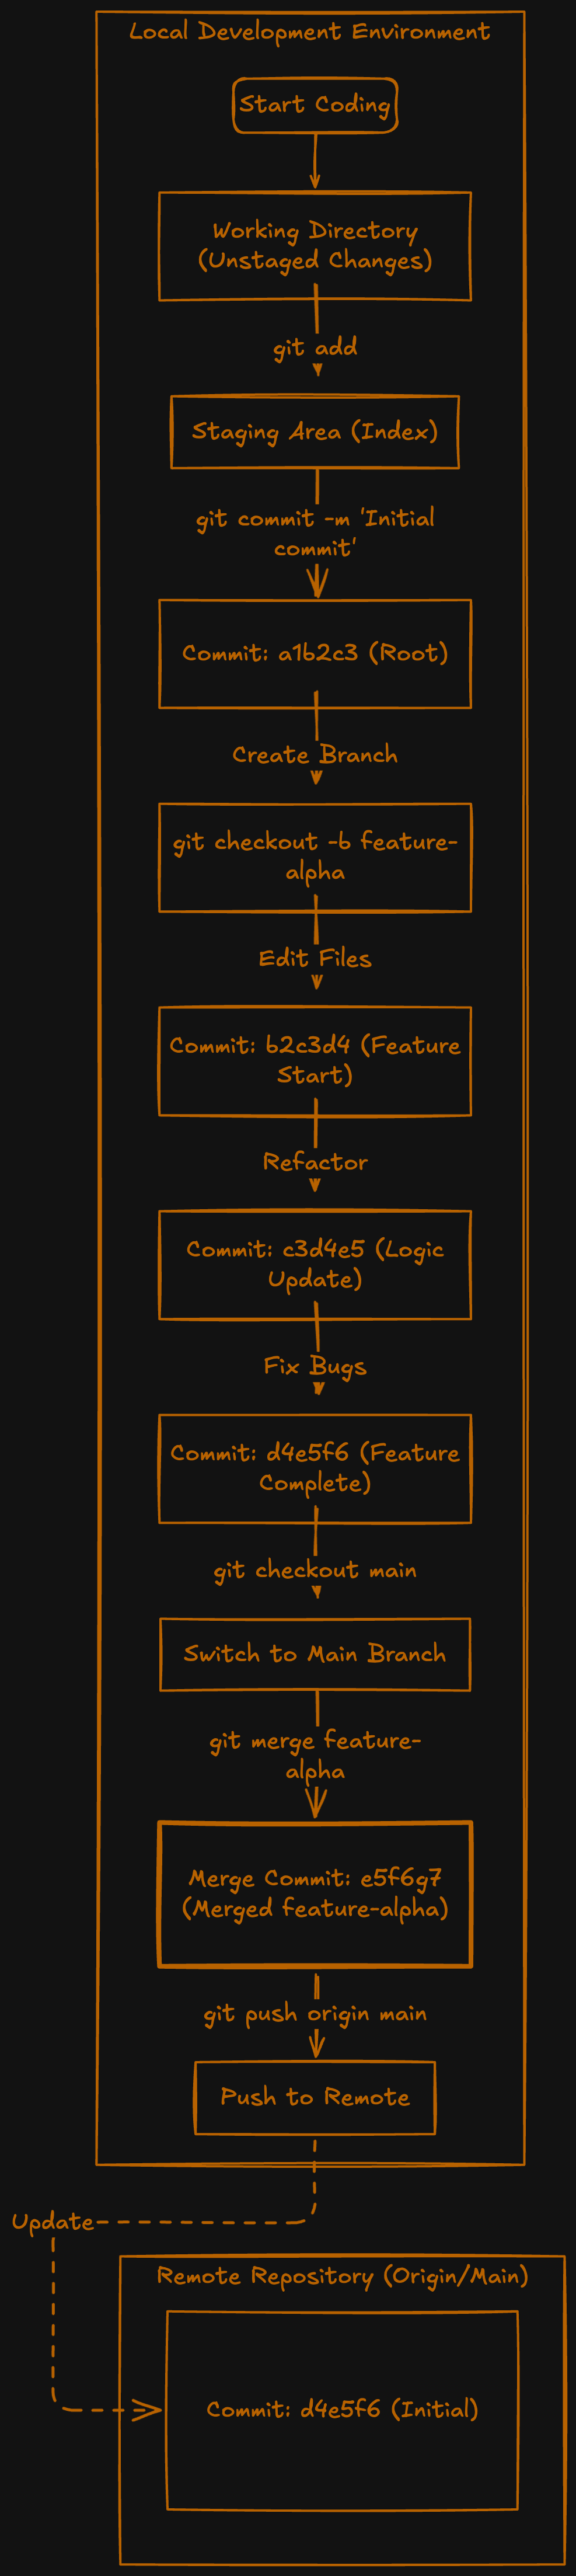
Commit History Flow
Connecting to GitHub
Before you can push, you need to connect your local repository to GitHub:
1. Create a new repository on GitHub (through their website)
2. Link your local repo to GitHub (copy the URL from your new GitHub repository):
git remote add origin <your_github_url>
3. Now you're ready to push!
Delivering the Work: git push
At this point, you might think you are done. You saved the file, right?
But here is the catch: git commit only saves changes on YOUR system. Since your friends are working on their own system from different cities, they still have no idea what you just did. If your system crashed right now, your work would be gone, and your friends would never see it.
To actually send your work to the shared project (the repository on GitHub), you need to use the git push command.
Continuing our shopping analogy:
Commit: You bought the items and they are in your bag.
Push: You are shipping those items to the shared warehouse so your friends can access them.
How to use it: To send your changes to the cloud, run:
git push origin main
My Weird Habit: In the beginning, after running the command git push origin main, I would just close my system(laptop). But there was always this tension: Did my code really push? So, I made it a habit to check the website. Seeing that "Updated 1 minute ago" message is very, very satisfying. It gives me peace of mind knowing the code is finally saved, I mean, actually safe in the cloud.
How your friends join in: git clone
While you use the git init command to initialize Git in your local directory, your friends will use the git clone command to join the project.
You can clone the project by running the following command in your terminal:
git clone <url_of_repository>
This command is incredibly powerful. By "powerful," I mean that it doesn't just download a copy of the project files; it copies the entire version history of the project and automatically links your friend's computer to the shared central repository.
Heads up: you do not need to run git init before using git clone. The cloning process handles the initialization for you. To join a project, simply find an empty folder on your system where Git hasn't been initialized yet. If you run git clone inside a folder that is already a Git repository, you will end up with a "repository inside a repository," which causes a lot of confusion and technical errors!
Staying Updated: git pull
We talked about git push (shipping your code to the warehouse). But remember, you are working with friends. While you were sleeping, your friend in another city might have fixed a bug or added a new feature and pushed it to the repository.
Right now, that new code is on GitHub, but it is not on your system. If you start working now, you will be working on an old version of the project.
git pull is the update button. It downloads the latest changes from the remote repository and combines them with your code.
**How to use it:**Before I start working on a collaborative project, or before I start coding for the day; I always run:
git pull origin main
What it actually does (Under the hood): git pull is actually two commands combined into one:
git fetch: It goes to the warehouse and checks, "Hey, is there anything new?"git merge: It takes those new files and mixes them into your folder.
My “Mini Heart Attack” Moment
Usually, git pull works like magic. But sometimes, it leads to the scariest thing for a beginner: The Merge Conflict.
My "Heart Attack" Moment: I remember the first time this happened. My friend and I both edited the same line of the same file (the footer section) at the same time. He pushed his code first. When I tried to git pull, my terminal screamed "CONFLICT" and my code turned into a mess of weird symbols like <<<<<<< HEAD and =======.
I stared at the screen and thought, "I broke it. I definitely broke the code."
But actually, Git was just being smart. It was saying: "Hey, you changed this line, but your friend also changed this line. I don't know which one to keep. You decide."
So, if you see those symbols, don't panic! You just have to delete the lines you don't want and save the file. That’s it.
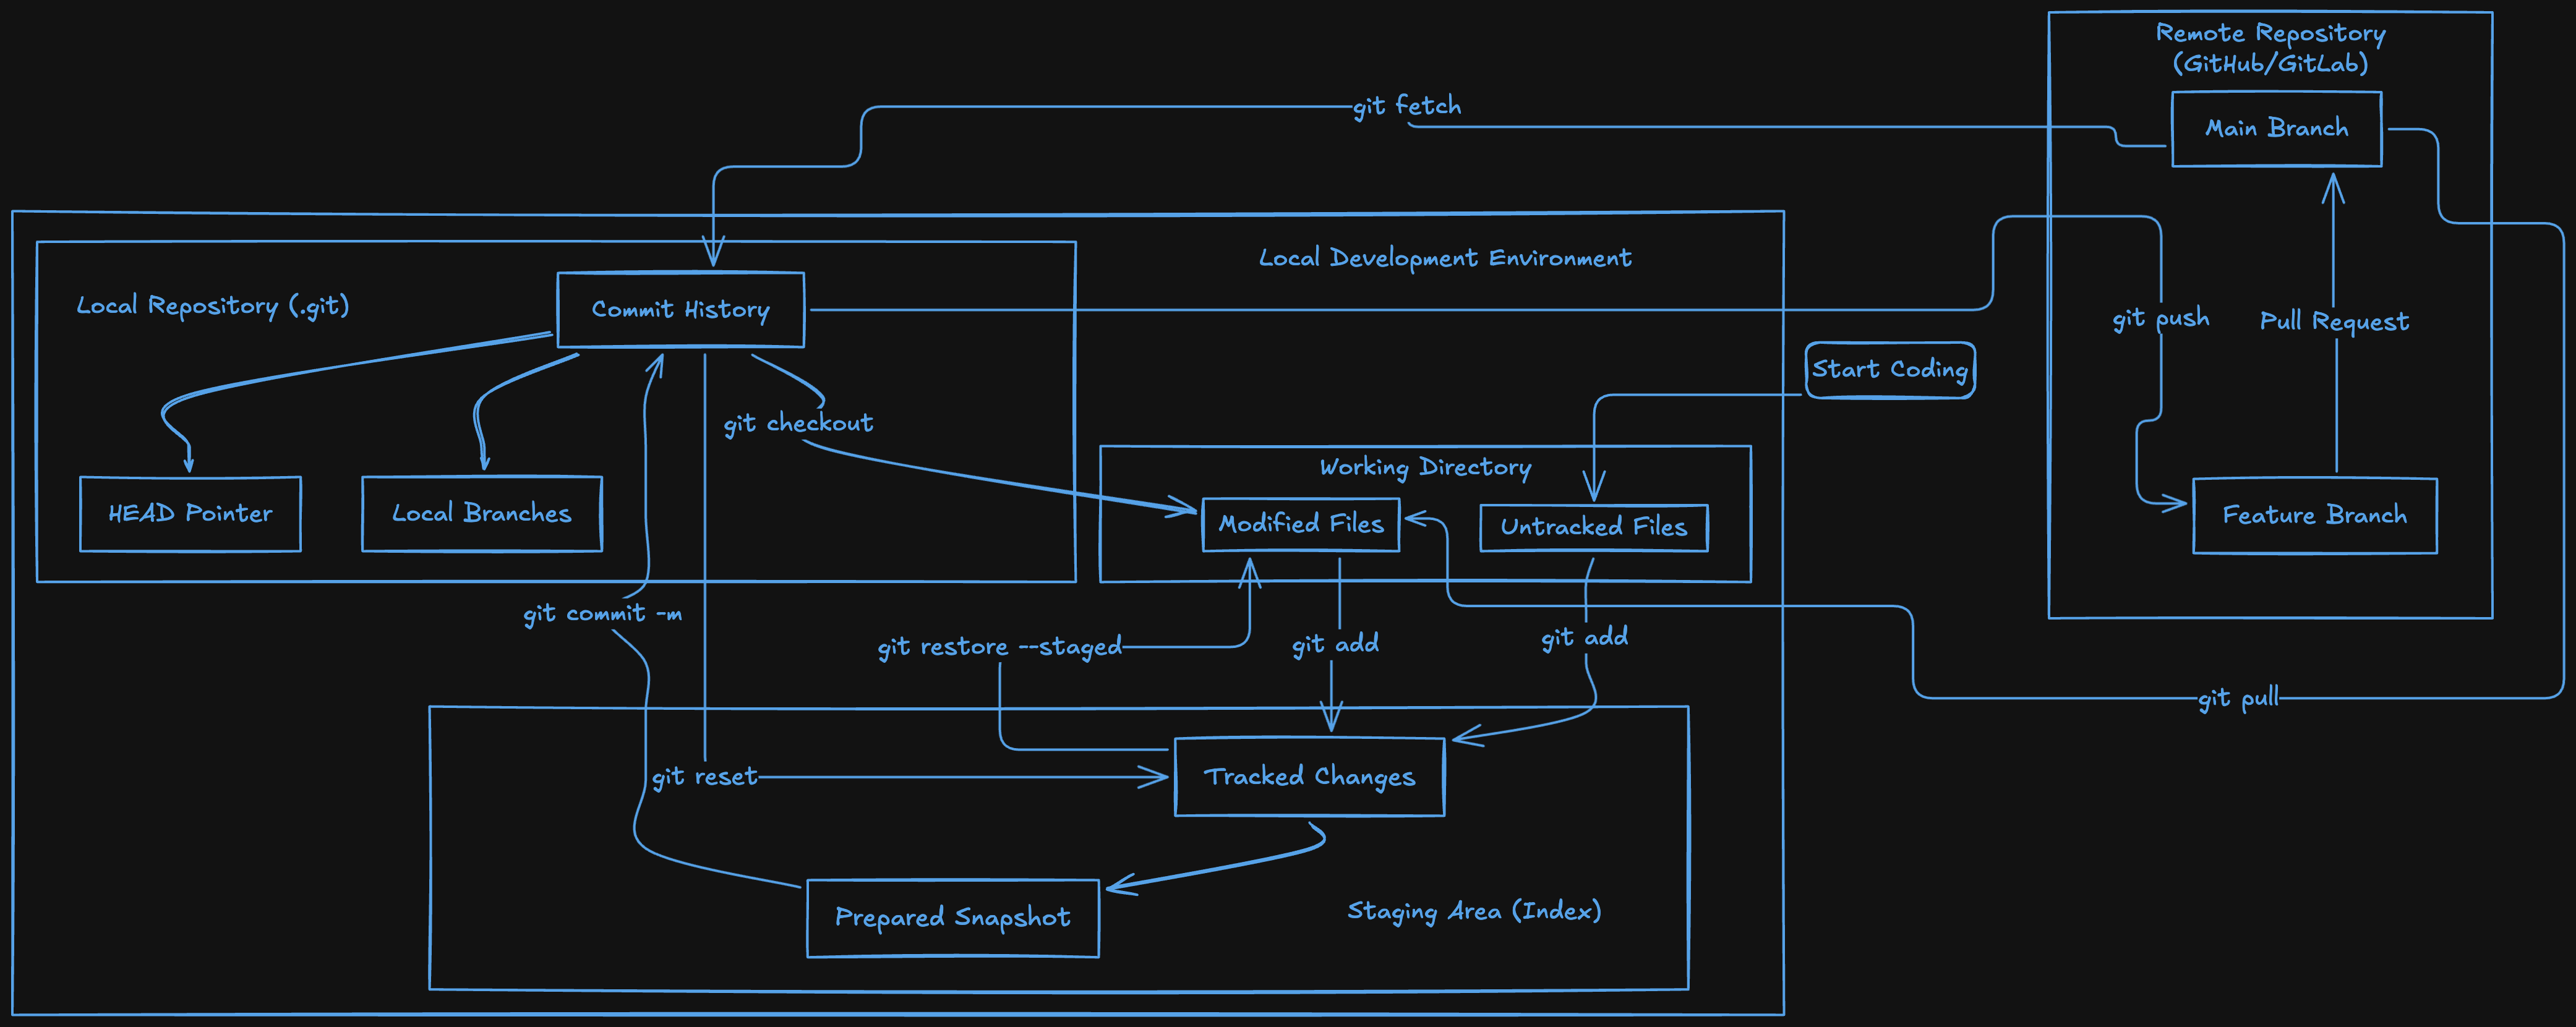
Git Working Directory Flow
The Receipt Book: git log
You’ve just "shipped" your code, and your friends have shipped theirs. But how do you keep track of everything that has been bought and shipped?
This is where git log comes in.
Remember how we said a Commit is like a Receipt? Well, git log is the Receipt Book. It shows you a complete list of every transaction (save) that has ever happened in your project.
How to use it: git log
When you run this, you will see a scrolling list showing:
Who made the purchase (Author).
When they did it (Date).
What they bought (The Commit Message).
The “Oops“ Moment: Honestly, I mostly use this command when I am confused about who changed the code in my file. This feature actually saved me so much time once. One night, a friend of mine changed the payment gateway method from Razorpay to something else in one of our projects. Suddenly, nothing was working, and I was wondering, "Why isn't this working?" Then I checked git log and found out he had changed the whole payment gateway method without telling me!
Quick Tip: If you run this command and get stuck in a screen where you can't type, just press q on your keyboard to exit. (I stared at my screen for 10 minutes the first time this happened to me!)
Checking the Inventory: git status
Okay, so you checked the history. Now you are ready to start a new task. But before you touch anything, you need to know exactly what is going on right now.
git status is the most reliable command in Git. It tells you exactly:
Where you are (Which branch/aisle).
What is in your cart (Staged/Green files).
What is still on the shelf (Untracked/Red files).
My Trust Issues: I have serious trust issues... with my own code. That’s why I use git status probably more than 100 times a day. It helps me understand exactly what is happening in the project in real-time. For example, if I go for dinner or take a 1 to 2 hour break, the moment I come back, I need to check the status to see where I left off.
Before I add files?
git statusBefore I commit?
git statusAfter I push?
git status
It’s my way of double checking that I haven't messed anything up. Plus, it is really satisfying to see the filenames turn from Red (untracked) to Green (staged). If you ever feel lost, just run this command. It never lies.
Spot the Difference: git diff
git status is great, but it has one limit: it only tells you the names of the files you changed. It doesn't tell you what you wrote inside them.
Sometimes you might stare at the screen and think: "Wait, I don't remember touching that file! What did I do?"
git diff shows you the exact lines you changed. It’s like those "Before and After" photos.
Red lines (-): Code you deleted.
Green lines (+): Code you added.
My Reality Check:
I mostly use git diff right before I commit because this is the final stage before submitting the code.
I remember one specific incident: I was working on the final part of a project and was just about to commit. Suddenly, a thought hit me. I had tried a new feature earlier that completely broke the navigation bar, but I wasn't sure if I had removed it.
I thought, "Wait, did I forget to delete that?"
I ran git diff and, sure enough, the broken code was still there! I almost shipped a broken navigation bar. Since then, I always use git diff before git commit.
The Undo Button: git reset
Sometimes, you get a little too lazy and type git add . because you don't want to type every filename manually.
But then you check git status and realize Mistake.
You accidentally added a file you shouldn't share (like your .env file with passwords) or a massive folder you forgot to ignore. Now it's stuck in the "Staged" area (Green), waiting to be shipped.
git reset is the fix. It simply takes the files out of the staging area and turns them back to "untracked" (Red). Also It doesn't delete your work; it just unstages it.
My Panic Moment:
I call this "The Panic Button" because of a specific incident that happened to me.
I was once in a huge hurry because I was already late for college. I had just finished my work and needed to push the changes quickly, so I typed git add . without thinking.
Suddenly, I realized I had made a mistake. I had accidentally added a file that I was still working on; it was incomplete and had a bug in it. I didn't want to push that broken code, but it was already added to the staging area.
This is where git reset saved me. I ran the command, and it took that file out of the staging area. It didn't delete my work; it just unstaged it so I could push the good code and leave for college without stress.
A Dangerous Variation: git reset There is also a much more aggressive version of this command called
git reset --hard
Note: But honestly, I'm scared of this one. It deletes your work permanently like gone forever. I only use it when I'm 100% sure I want to destroy everything.
Wrapping Up
So yeah, those are the Git commands I mostly use now!
Git was confusing for me at first. I'd see people talking about commits and branches and I was like "what even is this?" But once I actually started using these basic commands, it clicked pretty fast. Now I just use git add, git commit, git push, etc, without even thinking. And git status is literally my best friend I mean literally I run it like every 2 minutes to see what's going on.
The git reset thing saved me so many times when I accidentally staged the wrong files. And git pull keeps me updated with the latest changes. I still don't know everything about Git, not gonna lie. But these basic commands? I'm super comfortable with them now. They're literally all I need for my projects right now.
Git felt intimidating when I first started, but I actually enjoy using it and infact now it’s is just a normal part of my workflow.


